It is used to translate balances from functional currency to foreign currency at transaction level. Here we use Daily rates. There are three levels are there.
Balances level- All the balances will be translated.
Journal Level-All the journal entries will be translated
Sub ledger Level- All the journals from AP, AR will be translated.
Note: In reporting feature we will be having one primary ledger and unlimited reporting ledgers.
Setup Steps:
1. Define “Rounding Difference Tracking A/c” at account segment value.
2. Assign rounding difference a/c to ledger.
3. Define Exchange rate type
4. Define Exchange rates.
5. Define Reporting currency Setup’s in setup step at ledger level.
6. Define Reporting GL Responsibility.
7. Assign reporting Ledger to Reporting GL Responsibility.
8. Assign Reporting GL Responsibility to User .
9. Open periods in Reporting Currency responsibility.
10. Enter Journal in primary ledger and post it.
11. Query the journal in Reporting ledger to check the result.
Diffence between Multiple Reporting Currency in 11i and Reporting Currency in R12.
1. In 11i we can called as “Multiple Reporting Currencies” but in R12 we are calling like “Reporting Currencies”.2. In 11i we have to define reporting set of books and assign primary set of book to reporting set of books. But In R12 directly we can add reporting currencies to ledger. It is easy process.
3. In 11i we can report upto 8 reporting currencies but where as in r12 we can report en number of currencies.
4. In 11i we have one limitation to do MRC. If the chart of account and calendar should be same to do the MRC. But in R12 if the calendar or chart of account is differ we can do “Reporting currencies” by using Secondary Ledgers.
Let's see how to configure Reporting currency concept in R12
Step: 1 Define “Rounding Difference Tracking A/c” at account segment value.
Navigation: Setup--> Financials--> Flex fields--> Key--> ValuesEnter Structure name and Segment, Say “Find”
Enter “Rounding Difference Tracking Account” with Qualifiers as Yes, Yes, Expenses, No, No.
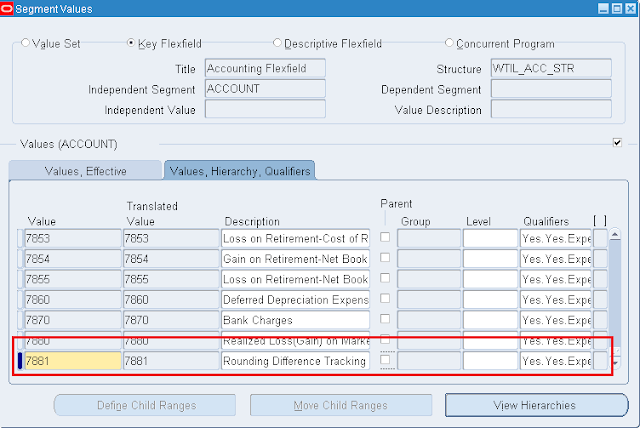
Now, Save it.
Step 2: Assign Rounding Difference Tracking account at Ledger level
Navigation: Setup --> Financials --> Accounting setup manager --> Accounting setupQuery your ledger and click on Update accounting optionsGo to Primary Ledger set up step and say Update
Go to “Ledger Options” tab and click on “Journal processing’ region and Assign “Rounding difference tracking account”.
Click on “Finish” and see for confirmation message.
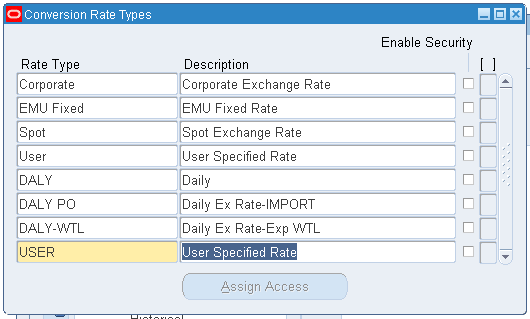
Step 3: Define exchange rate type
Navigation: Setup --> Currency --> Rate --> types
Click on New and Enter Rate type and Description
Save and close the window.
Step 4: Define daily ratesNavigation: Setup --> Currencies --> Rates --> Daily.
Click on New and fill the details as below
and Click on Enter by date range and fill the same details with Start date and end Date. Save and close the window.
Step 5: Define Reporting currency Setup’s in setup step at ledger
Level.
Navigation: Setup --> Financials --> Accounting setup manager --> Accounting setup.
Now, Query your primary ledger --> click on Update accounting options--> In setup step Click on update of “Reporting Currencies”.
Now, Click on “Add reporting currency”
Currency conversion level: JournalCurrency: USD
Enter reporting currency name
Enter short name & Description
Ledger Options:
First ever open period: Jan – 11
Add Rounding Difference tracking account
Currency Translation options:
Choose Default rate type
Retain transaction rate type: Yes
** If yes – Rate type will take from Primary ledger
** If No – It will take above default rate as per primary ledger
Error handling:
Missing conversion rate: Use last rate
Number of days to find the last rate: 5
Journal Conversion Rules:
Retain journal creator from source Ledger: Yes
Note:
1. If Yes – Journals will transfer from Primary to reporting
2. If No – Journals will not transfer
Update Journal Source: Other, Journal Category: other, Convert journals: Yes
Note: If you do not want to transfer all journals, click on “Add another row” to define source and category.
Data Conversion Initialization:First future conversion period – Apr 11
Historical Conversion:
Retain original conversion type: No
Choose historical conversion rate date & type
Say “Apply”
Update reporting currencies:
Now, You can see one more reporting ledger with “Journal” as currency conversion level
Click on Apply button.
Step 6: Define Reporting GL Responsibility.
System administrator Navigation: Security --> Responsibility -->Define.
Click on new and create Reporting GL Responsibility.
Save and close the window.
Step 7: Assign Reporting Ledger to Responsibility.
System Administrator Navigation: Profile --> system.
Select your Responsibility and Profile Option as shown below
Click on Find button, and Enter Reporting Currency in Responsibility field.
Save and close the window.
Step 8: Assign Reporting GL Responsibility to the User.
System Administrator Navigation: Security --> User --> Define.
Query the user name and assign Reporting GL Responsibility to the user.
Save and close the window.
Step 9: Open periods in reporting GL Reponsibility.
Switch to Reporting GL Responsibility.
Navigation: Set up --> open / close.
Open till Current Period.
Close the window.
Step 10: Create Journal in Primary Ledger and post
Switch to Primary Ledger Responsibility.
Navigation: Journal --> Enter
Click New Journal Button and enter Mandatory Information to test it.
Save and post it.
Step 11: Review Journal in Reporting ledger.
Switch to Reporting Ledger Responsibility.
General ledger Navigation: Journal --> Entry.
Query the query the journal to view it.
Close the Window.